The mandolin, an instrument of elegance and resonance, has been delighting listeners for centuries. If you’ve been inspired to pick one up and learn how to play, you’ll soon discover that a properly tuned mandolin is the secret to producing beautiful, harmonious melodies. However, tuning this eight-stringed instrument may seem a little daunting to beginners. Fear not, for this blog post will guide you step by step through the process, transforming you into a tuning expert in no time.
The mandolin is typically tuned to the notes G, D, A, and E, moving from the lowest pitch string to the highest. While there are many types of mandolinsthe Neapolitan, the flat-backed, the carved top, and the archtop, to name just a few the tuning process remains largely the same. The musical charm and expressiveness of the mandolin stem from its double-string configuration. This unique design requires a precise tuning method, which, once mastered, will ensure that your mandolin sounds rich and harmonious every time you play.
Mandolin’s Tuning in a Nutshell
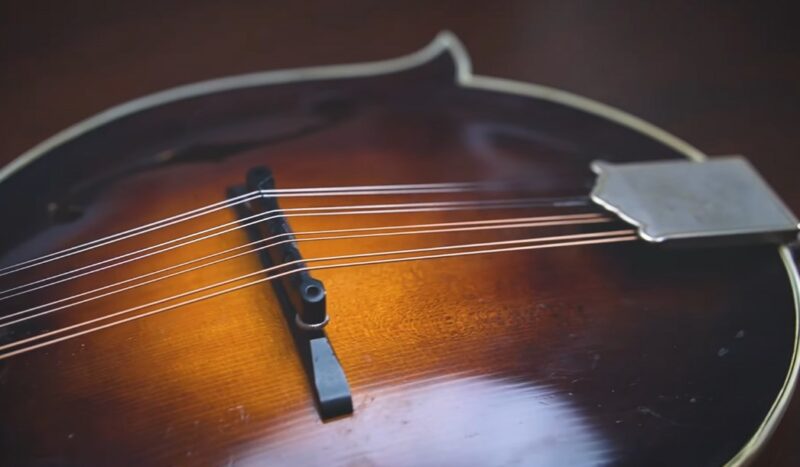
Before diving into the specific steps, let’s explore the basic concept of tuning a mandolin. Each ‘string’ of the mandolin is actually a course of two strings that are tuned to the exact same pitch. From low to high, the tuning should be G, D, A, and E resembling the violin’s tuning but one octave higher.
Each pair of strings is tuned in unison, meaning they should resonate at the same frequency. When both strings in a pair are perfectly tuned, they should sound like one string being plucked. If they are not in tune, you’ll hear a ‘wavering’ or ‘beating’ sound due to the different frequencies. This is a clear signal that the strings need adjustment.
The goal of mandolin tuning is to create a harmonious blend of tones that allows for precise and melodic playing. When your mandolin is correctly tuned, you’ll find that your music has an enhanced clarity and a pleasing, resonant quality.
Step 1: Get a Reliable Tuner
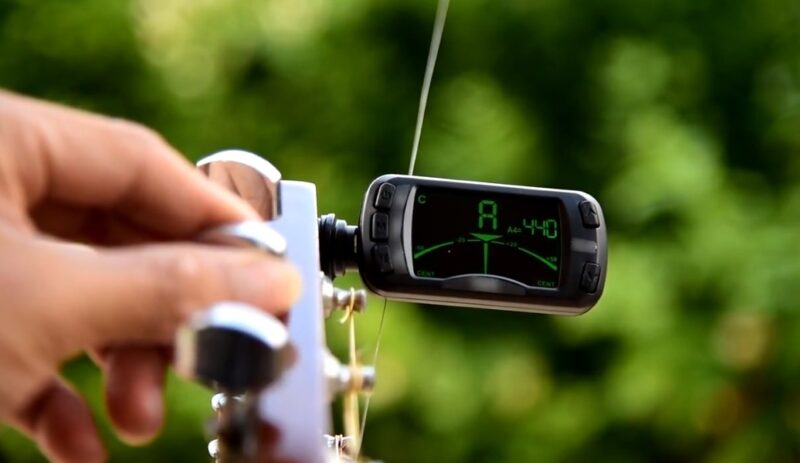
Before you begin tuning your mandolin, you’ll need a reliable tuner. While it’s possible to tune by ear, beginners often find it helpful to use a digital tuner, especially while still developing their ear training. Digital tuners are accurate, affordable, and easy to use.
There are numerous tuners available, including clip-on tuners that attach directly to your mandolin’s headstock and mobile apps that use your smartphone’s microphone. Clip-on tuners work by picking up the vibrations of your instrument, which makes them especially useful in noisy environments. Tuning apps, on the other hand, can offer a broad range of additional features, like different tuning modes and metronomes.
When choosing a tuner, consider your needs and your environment. Always aim for accuracy and ease of use, and don’t hesitate to try different types until you find one that feels right for you.
Step 2: Tune the First String (E)
Now that you have your tuner let’s begin the tuning process with the first string — the E string. This is the highest-pitched string and the one closest to the floor when you’re holding your mandolin.
Start by plucking one of the strings in the E course. Your tuner should indicate whether the string is in tune (green light or a centered needle) or whether it’s sharp (higher than the target pitch), or flat (lower than the target pitch). If the string is sharp, you’ll need to loosen it slightly by turning the tuning peg counterclockwise. If it’s flat, tighten it by turning the peg clockwise. Make these adjustments gradually, checking the tuner frequently to prevent overtightening and possible string breakage.
Once you’ve tuned one string in the pair, move on to the other. Repeat the same process, keeping in mind that both strings should sound as one when correctly tuned.
Step 3: Tune the Second String (A)
The next string to tune is the A string. This string is located next to the E string, moving up toward the headstock of your mandolin.
The process for tuning the A string is the same as the E string. First, pluck one string in the pair while observing your tuner. Adjust the tuning peg clockwise to raise the pitch or counterclockwise to lower it. Fine-tune until your tuner indicates that you’ve hit the target pitch. Then, proceed to the other string in the pair, ensuring both are perfectly matched in their pitch.
Remember to take your time and make gradual adjustments. The aim here is precision and harmony, so there’s no need to rush.
Step 4: Tune the Third String (D)
Moving along, the next pair of strings to tune are the D strings. As with the E and A strings, the process remains the same. Start with one string in the pair, adjust the pitch according to your tuner’s feedback, then move on to the other string.
By now, you’re probably getting the hang of it. Tuning is a meticulous process, but with patience and practice, it becomes second nature.
Step 5: Tune the Fourth String (G)

Last but not least, it’s time to tune the G strings. This pair is the last set of strings you’ll tune. Again, follow the same process. Once you’ve tuned the first three sets of strings, you should find that tuning the G strings becomes easier. This is the final step in tuning the strings of your mandolin to their correct pitches.
Step 6: Check the Overall Tuning
With all four pairs of strings tuned, it’s important to check the overall tuning of the instrument. Pluck each string, starting from the G and moving up to the E. Listen for any discrepancies or ‘wavy’ sounds that might indicate a string pair has fallen out of tune.
A good way to check your overall tuning is to play a few chords or scales that utilize all strings. This should give you a clear idea of how well your mandolin is tuned. If something doesn’t sound quite right, don’t be discouraged. It’s normal to have to make minor adjustments after the initial tuning.
Step 7: Monitor String Stability

Congratulations! You’ve successfully tuned your mandolin. However, the process doesn’t end here. Maintaining the tuning stability of your strings is a crucial part of playing the mandolin.
Factors like temperature, humidity, and the age of your strings can affect tuning stability. Keep an eye (or rather, an ear) out for any signs that your strings are going out of tune. If you find yourself needing to tune frequently, it might be time to change your strings.
A well-tuned mandolin not only sounds better but also makes learning and playing more enjoyable. Regularly checking and adjusting your tuning will help you maintain the beautiful sound of your instrument.
Tuning Ratios Explained
One key aspect that can significantly impact the tuning process is the ratio of your tuning machine, also known as a tuning peg or tuner. The tuning ratio refers to how many times you have to turn the tuning key for the post (where the string is wound) to make a full rotation. For instance, a 14:1 ratio means you need to turn the tuner 14 times for the post to complete one full rotation.
Higher ratios provide more control and finer tuning adjustments. If you’re having trouble keeping your mandolin in tune or making precise adjustments, consider upgrading your tuners to ones with a higher ratio.
Harmonics Tuning
Beyond using an electronic tuner, you can also use harmonics for tuning. Harmonics are natural resonances that occur at certain points along the string. To use harmonics for tuning, lightly touch the seventh fret of the lower string (don’t press it down) and pluck the string. You should hear a clear, bell-like tone. Now, without adjusting your left hand, pluck the open string above it (which should be the higher string). The two notes should match. If they don’t, adjust the higher string until they do.
Keep in mind, however, that harmonics tuning can be a bit trickier than using a digital tuner, especially for beginners. It requires a keen ear and familiarity with the unique sound of harmonics. But with practice, it can become a powerful tool in your tuning arsenal.
Stretching Your Strings
New strings, or even older ones that haven’t been played in a while, can take time to settle and hold their tuning. To speed up this process, you can manually stretch your strings.
After tuning your mandolin, firmly grasp each string (one at a time) in the middle and gently pull it away from the mandolin’s body, then retune. Repeat this process a few times until the strings hold their tuning more consistently. Be careful not to pull too hard or too suddenly to avoid snapping the strings.
Fret Intonation
Lastly, let’s touch upon fret intonation. Intonation refers to the accuracy of the pitch produced when you fret a note. If your mandolin’s intonation is off, the notes will progressively sound out of tune as you move up the fretboard, even if your open strings are perfectly in tune.
Checking intonation involves comparing the pitch of the open string to the pitch at the 12th fret (an octave higher). If the 12th fret note is sharp, the string length needs to be increased. If it’s flat, the string length needs to be reduced. Adjustments can typically be made at the bridge, but it’s a delicate process. If you’re unsure, it’s best to consult with a professional.
Closing Thoughts
Tuning a mandolin might seem complex at first, but with these seven steps and a little practice, you can master this essential skill. Remember, a finely-tuned mandolin is the key to a satisfying playing experience and beautiful music.
Your journey as a mandolin player is unique, and tuning is just one part of that journey. So whether you’re preparing for your first jam session, about to step onto a stage, or simply playing for your own enjoyment, knowing how to tune your mandolin confidently and accurately ensures your music will always hit the right notes.
Discovering the musical icons, this article delves into the vibrant world of Mexican singers, highlighting 19 of the most popular ones and their significant contributions to the music industry.